 minute read
Configure Locker SSO for Epic Rover, Haiku and Canto
Applies to iOS devices only.
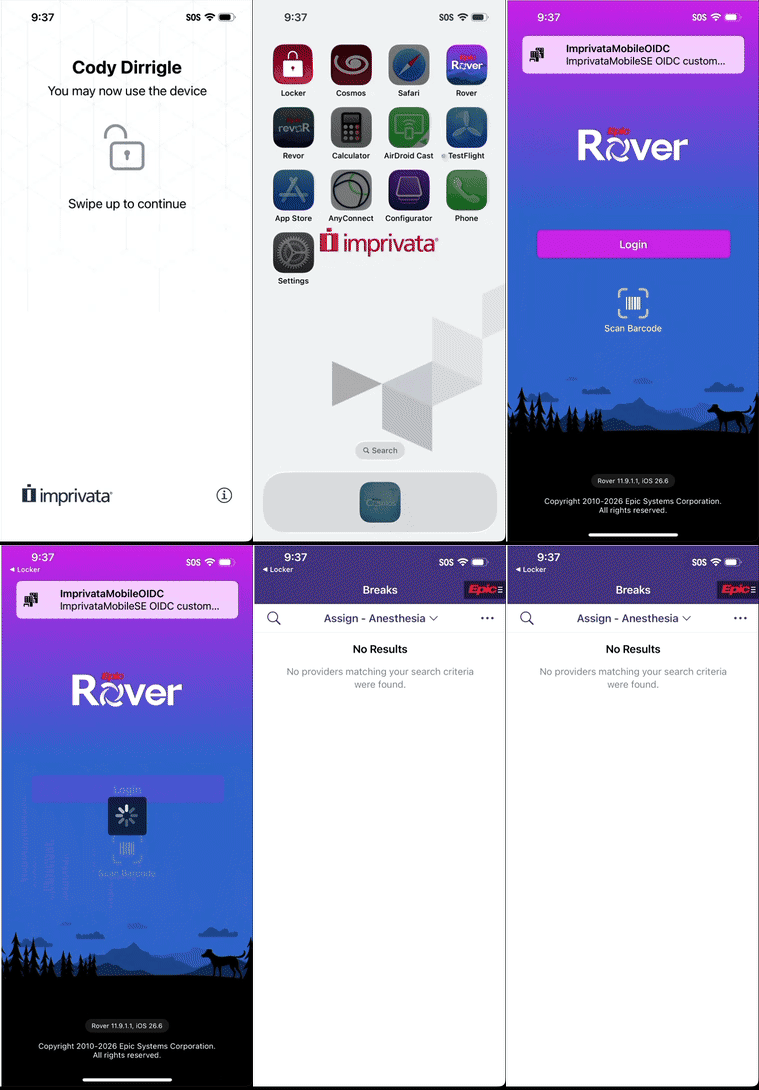
Imprivata Mobile Access Management adds authentication to OpenID Connect (OIDC) apps that are configured for OIDC with Imprivata as the Identity Provider (IdP). Authentication shares the MAM user session with Epic Rover, Haiku, and Canto so that a user does not need to enter credentials for authentication to Epic.1.
The app session is secured with the user's personal device passcode.
Locker SSO is not mutually exclusive with Password Autofill. You can still use Password Autofill on other applications, however, you may want to hide the Password Autofill prompt by configuring a Locker Custom Option. Imprivata recommends setting Locker SSO as the default/primary option.
Prerequisites
Supported in MAM 7.3 and later.
Take note of the following prerequisites:
-
Imprivata Locker app for iOS - 4.3 or later.
-
Password Autofill and SSO setting is enabled in MAM console (Admin > Check Out > Password Autofill and SSO).
-
Integration with Imprivata Enterprise Access Management.
The following EAM dependencies for OIDC integration must be completed:
-
Imprivata appliances are running a maintained release of EAM. For more information, see the EAM Supported Components.
-
Imprivata licensed for Single Sign-On.
-
Epic Rover, Haiku, and Canto apps are added to your Imprivata enterprise.
-
Epic Rover, Haiku, and Canto apps are deployed to a selected set of users.
-
Imprivata users are assigned to a user policy enabled for Single Sign-On.
-
SSO Extension profiles are deployed from your MDM.
-
-
Epic
-
Open a Sherlock checklist using checklist template 1975.
-
For troubleshooting, see Troubleshooting OIDC Login Errors.
-
-
Key Resources to include during implementation:
-
Customer: Epic Client Systems Analyst (ECSA)
-
Epic: Mobile TS, Client Systems – Web & Interconnect Services
-
Imprivata: Project Manager, Implementation Engineer
-
Network Requirements
Ensure that your firewall policy is configured to allow communication for Locker SSO.
Add the following hosts to your firewall allow list:
*.cloud.imprivata.com
 Step 1: Imprivata Appliance Configuration
Validate Epic Rover, Haiku, and/or Canto settings in the Imprivata Admin Console:
| Setting | Required / Optional | Imprivata Admin Console location |
|---|---|---|
| Appliance is running a maintained release of Imprivata Enterprise Access Management | Required | Help menu |
| Imprivata Single Sign On is licensed | Required | Gear menu > License |
| Imprivata enterprise is provisioned and connected to the cloud | Required | Gear menu > Cloud connection |
| Epic Rover, Haiku, and/or Canto is added and enabled in the Imprivata Admin Console | Required | Applications > Single sign-on application profiles |
| Epic Rover, Haiku, and/or Canto applications are deployed to selected set of users | Required | Applications > Single sign-on application profiles |
| Imprivata users are assigned to user policy enabled for Single Sign On | Required | Users > User policies |
Step 2: Imprivata Cloud Connection
Imprivata Services will enter the Enterprise ID and one-time cloud provisioning code required to establish trust between your Imprivata enterprise and the Imprivata cloud:
-
In the Imprivata Admin Console, click the gear icon > Cloud connection.
-
Services will enter your Enterprise ID and cloud provisioning code. (The cloud provisioning code expires 5 minutes after it's generated. Generate a new code if 5 minutes has elapsed.)
-
Click Establish trust.
IMPORTANT:The cloud connection must be established by Imprivata Services.
Step 3: Exchange Metadata and Configure OIDC for Epic
Beginning with MAM 7.3 and Locker iOS 4.3, using Locker SSO is the preferred method for authenticating to Epic Rover, Haiku, and Canto.
If you need assistance, contact your Epic Client Systems H&D TS.
-
For customers on Epic versions Feb 2026 and earlier, see this Galaxy guide.
-
For customers on Epic versions May 2026 and later, see this Galaxy guide.
Imprivata SSO (IdP) and Epic need metadata from each other.
Open both applications at the same time to gather and share the following metadata:
| Metadata Element | Where to Obtain | Where to Provide |
|---|---|---|
| Claims and required scopes (Profile, OpenID) |
In the Claims section of the Imprivata Admin Console application profile. Use the default values. |
Epic Rover Analyst. Pull in the customer’s ESCA (Epic Client Systems Analyst) and the Client Systems H&D TS for additional assistance. See step 6 below. |
| Client Credentials |
In the Client credentials section of the application profile:
|
Epic Rover Analyst. Pull in the customer’s ESCA (Epic Client Systems Analyst) and the Client Systems H&D TS for additional assistance. See steps 7-9 below. |
| Imprivata (IdP) OpenID Connect metadata |
In the Imprivata Admin Console, go to the gear icon > Web App Login Configuration.
|
Epic Rover Analyst. Pull in the customer’s ESCA (Epic Client Systems Analyst) and the Client Systems H&D TS for additional assistance. See steps 7-9 below. |
| Issuer URL |
In the Imprivata Admin Console, go to the gear icon > Web App Login Configuration.
|
Epic Rover Analyst. Pull in the customer’s ESCA (Epic Client Systems Analyst) and the Client Systems H&D TS for additional assistance. See steps 7-9 below. |
A full list of required inputs needed for Epic’s side of the configuration can be found in step 2.2 in the Sherlock checklist 1975.
From Epic, obtain:
| Metadata Element | Where to Obtain | Where to Provide |
|---|---|---|
| Redirect URI |
Use the exact URL: com.epic.rover.oidc://callback |
Enter the redirect URI in the Redirect URI box in the Imprivata Admin Console. See steps 1-5 below. |
-
In the Imprivata Admin Console, go to Applications > Single sign-on application profiles.
All Single sign-on application profiles, including Mobile app profiles and OpenID Connect application profiles, are managed from this page.
-
Click Add App Profile > Application using OpenID Connect. The Add application using OpenID Connect page opens.
-
In the Application profile name box, type
Epic Roveras the application profile name. This name is only visible to administrators. -
In the Application user-friendly name box, type
Roveras the user-friendly name for the application. This is the application name your users will see when they log in. -
In the Redirect URIs box, type the Redirect URI for Epic.
com.epic.rover.oidc://callback)
-
In the Claims section, for Epic Rover, leave the default values. These include:
Scope Claim name Attribute Mapping ID token Access token Profile (required by Epic) name User logon name – Pre W2K (SAMAccount) checked unchecked given_name First name (givenName) checked unchecked family_name Last name (surname) checked unchecked upn User logon name (userPrincipalName) checked unchecked Email email Email address (mail) checked unchecked Profile is a required scope to configure on the Epic side.
Name is used in the username claim in the User ID Mapping record.
UPN is used in the Token ID claim field in the User ID Mapping record.
-
In the Client credentials section:
-
Click Generate Client credentials to provide to Epic. A Client ID and Client secret are created.
-
Securely provide the Client ID and Client to your organization's Epic ECSA who will need to configure Epic Rover to use OIDC.
- Conditional - Select Public client to work with public OIDC clients. By default, all OIDC profiles are confidential. IMPORTANT:
Public clients are less secure because they run in environments where secrets cannot be reliably protected. Use with caution.
-
-
Click View and copy Imprivata (IdP) OpenID Connect metadata.
-
Copy the Issuer URL. Provide the Issuer URL value to your Epic TS. They will generate a new econfig URL* or modify the existing one. This will include the authorization endpoint and the token endpoints that Epic needs.
NOTE:Ensure that the econfig URL is an internal URL for the customer organization.
-
-
Click Save.
Step 4: Deploy an SSO Extension
In your MDM, create and deploy an SSO Extension that enables single sign-on.
-
In your MDM's admin console, create an SSO extension profile with the following information:
-
Give the profile a unique, identifiable name, such as 'Imprivata Locker SSO Extension'.
-
Extension identifier: com.imprivata.b2b.locker.ssoextension
-
Type: Redirect
-
URLs: https://oidc.idp.cloud.imprivata.com
-
-
Assign the SSO Extension to the devices.
Microsoft Intune
-
In Devices > iOS/iPadOS | Configuration > Manage devices > Configuration, create a new policy with the name 'Imprivata Locker SSO Extension'.
-
Select Templates from the Profile type list.
-
Select Device features and click Create.
-
-
Expand the Authentication section of the new policy.
-
For Extension identifier, type
com.imprivata.b2b.locker.ssoextension -
For Type, select Redirect.
-
For URLs, type
https://oidc.idp.cloud.imprivata.com -
Save the SSO Extension and assign it to your devices.
Omnissa Workspace ONE
-
In Resources > Profile Details > SSO Extension, configure the SSO extension for Imprivata Locker.
-
On the SSO Extension tab, configure the following information:
-
For Extension identifier, type
com.imprivata.b2b.locker.ssoextension -
For Type, select Redirect.
-
For URLs, type
https://oidc.idp.cloud.imprivata.com
-
-
Save the SSO Extension and assign it to your devices.
Step 5: Configure MAM
Configure several settings in MAM to support the integration.
-
In the MAM console, go to Admin > Check Out.
-
Switch the Password Autofill and SSO setting to ON.
-
Switch the Require a second factor to unlock the device setting to ON.
This setting controls whether users must provide a second factor in the Locker app during checkout to unlock the device.
NOTE:This setting is enabled and not visible to disable for organizations created as of MAM 7.0 (June 2025).
Step 6: Epic / Rover Team
Complete Epic build:
-
For customers on Epic versions Feb 2026 and earlier, see this Galaxy guide.
-
For customers on Epic versions May 2026 and later, see this Galaxy guide.
Face Authentication for Epic Rover, Haiku, and Canto
Beginning in MAM 7.3, as a standard workflow, you can eliminate the device passcode and allow users to use face authentication for Epic Rover, Haiku, and Canto.
-
At device checkout, users are not prompted for a device level passcode. Instead, MAM secures the apps with Face authentication and short inactivity timeouts.
-
Supports any apps that use OIDC.
-
Gives high assurance that the user of the app matches the user who checked out the device.
Requirements
Face authentication for Epic Rover requires the following:
-
Requires an Imprivata Advanced Passwordless Access (APA) license.
Considerations
Application-level timeouts that require the user to re-authenticate are controlled by the individual apps themselves.
There is no way to configure this in either EAM or MAM, and is not affected by EAM user policy grace periods for multi-factor authentication (MFA).
Technical Readiness Checklist
-
Network Change: Add *.cloud.imprivata.com to firewall allow list
-
Imprivata EAM:
Before working with Epic – work with the Imprivata EAM team:
-
Create the OIDC app within EAM and deploy to users
-
Confirm the Imprivata Cloud Connection
-
Generate:
-
Client ID
-
Client Secret
-
Issuer URL
-
-
Supply this output to Epic Rover team for E0A Setup
-
-
Imprivata MAM:
Work with the Imprivata MAM team to:
-
Confirm the required Check Out Admin controls
-
-
Epic / Rover Team:
We recommend you work with Epic to open a Sherlock checklist using Checklist ID 1975.
-
MDM Team:
Work with your MDM team to:
-
Prepare to push eConfig
-
Configured SSO Extension & OIDC
-
-
-
Clinical User Acceptance Testing:
NOTE:Always perform clinical user acceptance testing before moving the new Rover configuration to production. Your Imprivata services team will assist.
-
2 or more devices
-
2 or more Epic Rover user accounts
-
Validate new Locker SSO into Rover and user switch multiple times on both devices
-
Regression test all other apps with Autofill
-
-
Production Rollout:
Set Locker SSO as the second Primary Device in Epic before moving it to Primary.
-
Communicate the change ahead of time
-
Validate that 5+ prod users can use Locker SSO manually
-
Enable as first Primary Device for all users


