Integrate Imprivata Enterprise Access Management
Mobile Access Management's Check Out feature requires customers to connect to a web service to handle the translation of proximity badge IDs to user IDs.
This topic describes how to integrate with Imprivata Enterprise Access Management (formerly Imprivata OneSign) for identity lookup.
If you don’t have EAM, you may use a custom identity lookup service.
Prerequisites
Take note of the following prerequisites:
-
Imprivata enabled the Check Out feature for your organization.
-
You have met the prerequisites for the Check Out and Password AutoFill features, including appropriate Imprivata licensing.
-
You verified that Check Out is working with the built-in Mobile Access Management User Service.
Available Authentication Methods for MAM Device Check Out
MAM supports a variety of EAM authentication methods for device Check Out.
The integration of MAM and Enterprise Access Management supports the following primary and secondary factors for authentication.
-
For some first factors, you can allow a limited user choice for the second factor. For example, if proximity card is the first factor, you can allow network password as the second factor.
-
The authentication methods are configured in the Imprivata Admin Console in user policies.
-
The Authentication tab of a user policy controls the authentication methods and options (authentication rules) that define authentication behavior for Enterprise Access Management.
-
Some combinations of authentication factors are not supported by Mobile Access Management for device Check Out. The following table illustrates the EAM primary and secondary authentication method selections and the resulting Check Out behaviors in MAM.
| Primary | Secondary | MAM Device Check Out Behavior |
|---|---|---|
| Check Out is initiated by the user taking a device out of the Smart Hub | ||
| Password | No second factor |
|
| Check Out is initiated by the user tapping their proximity card on a Launchpad | ||
| Proximity Card |
‡ |
|
| Proximity Card | No second factor |
|
| Proximity Card | Password |
|
| Proximity Card | Imprivata PIN |
|
‡ Facial recognition requires Imprivata appliances running the 25.2 or later software and the connection to the Imprivata Cloud Platform.
Configure Imprivata Enterprise Access Management
Configure API Access to EAM using the Imprivata Admin Console.
To configure the API access:
-
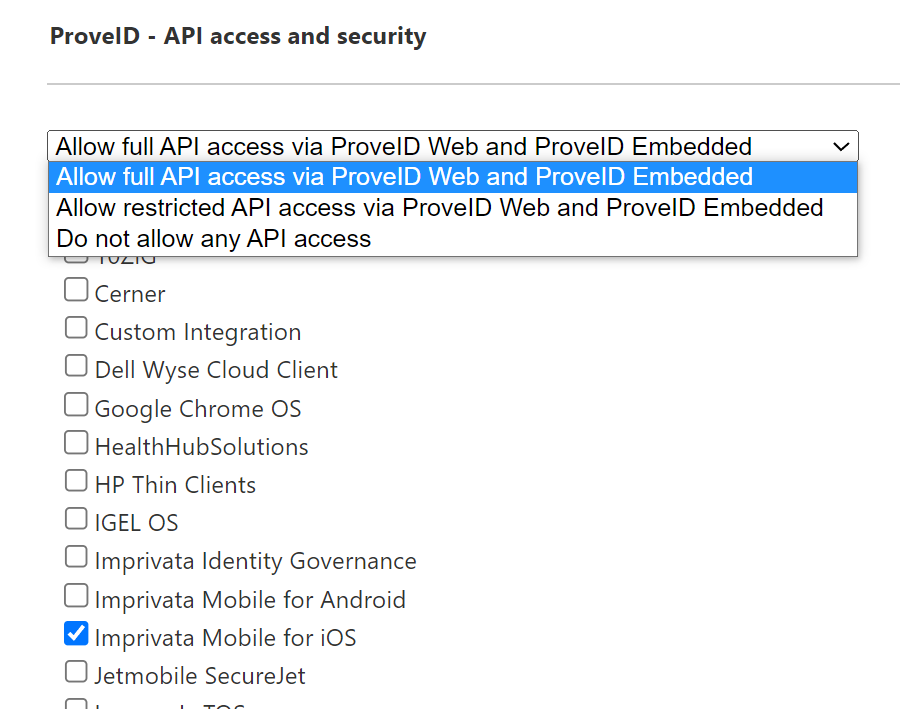
Log into the Imprivata Admin Console and go to the gear icon > API Access.
-
Under ProveID – API access and security, select Allow full access via ProveID Web and ProveID Embedded.
Click to enlarge
-
Select the API access needed for the OS of your devices:
-
For iOS devices, select the Imprivata Mobile for iOS checkbox.
-
For Android devices, select the Imprivata Mobile for iOSand the Imprivata Mobile for Android checkboxes.
-
-
Click Save.
Mobile Access Management organizations with Check Out using EAM as the Identity provider create a host (computer) in EAM for every Launchpad registered. That computer in EAM gets a computer policy which must have a proximity card enabled to be able to perform a checkout with a tap.
-
Confirm that there is no override in the computer policy that the Launchpads are assigned to. If the Launchpads are assigned to the Default Computer Policy, no changes should be needed.
-
MAM's iOS devices are displayed in the Imprivata Admin Console as Prove ID Web devices; confirm that the mobile devices are in the Default Computer Policy. If they are assigned to the Default Computer Policy, no changes should be needed.
-
Confirm that the user policies your mobile users are assigned to allow proximity cards as a primary factor.
If all of the above conditions are true, no changes are needed.
-
However, if an override is already enabled within the computer policy the Launchpads are in, ensure that Proximity Card is allowed in the override.
-
If this is not possible or allowed for your organization, Imprivata recommends moving the Launchpads and devices into a separate computer policy.
If you've performed the validations above, and computer policy changes are needed for your environment, follow these steps.
Otherwise, skip to the Mobile Access Management Setup section.
-
In the Imprivata Admin Console, go to Computers > Computer policies and select the computer policy your Launchpad is using.
-
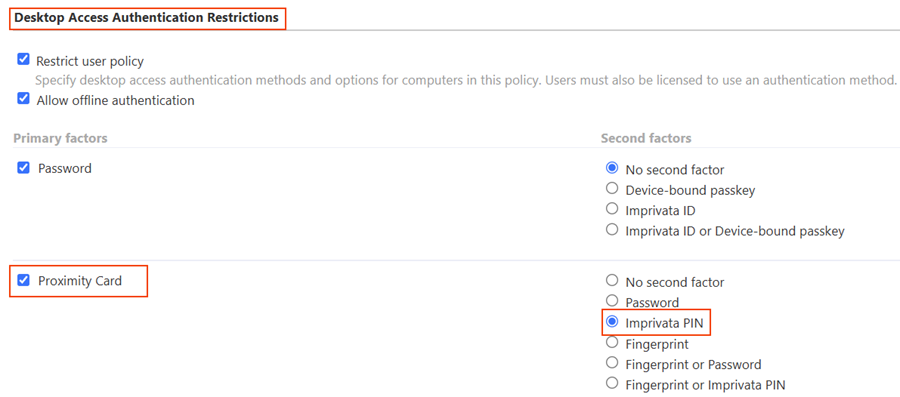
In Override and Restrict tab > Desktop Access Authentication Restrictions section, make sure that the option for Proximity Card is selected (enabled).
Click to enlarge
Depending on the authentication methods defined in the user policy and computer policy, ensure that you have configured the appropriate grace periods for the second authentication factor.
For example, when using proximity cards as the second authentication factor, you can set a grace period for the second authentication factor after successful authentication, up to 24 hours 59 minutes.
The settings are available in the Authentication method options section of the Authentication tab of the Imprivata Admin Console.
Configure Mobile Access Management
In the MAM admin console, configure the integration with Imprivata Enterprise Access Management:
-
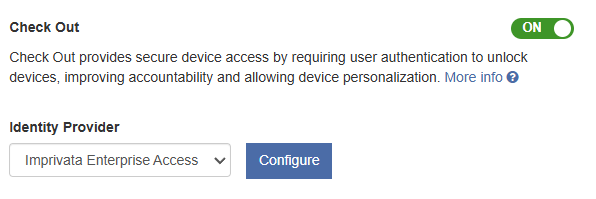
In the MAM console, navigate to Admin > Check Out.
-
In the Check Out section, switch the setting to ON.
-
In the Identity Provider section, select Imprivata Enterprise Access Management from the list and click Configure.
Click to enlarge
-
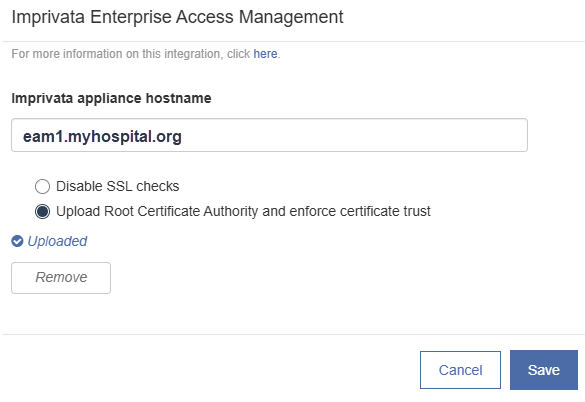
In the dialog, in the Imprivata appliance hostname box, type the hostname of your Imprivata appliance.
NOTE:Use the FQDN when specifying the Imprivata appliance hostname. DNS names ending in '.local' are not supported.
Click to enlarge
-
If your organization uses a root certificate authority, upload that CA certificate to this dialog, in PEM, CER, CRT, or DER format. Otherwise leave Disable SSL checks selected. Click Save.
-
Restart any Launchpads as prompted.
To test this configuration, in the MAM console, click the Launchpads tab, then open one of your Launchpads. In Launchpad Actions, select Test Identity Web Service.
Certificates are not required for Check Out or Password AutoFill Workflows. But if your organization would like to enable SSL trust certificates, these requirements must be met:
-
As per Apple’s trust certificate requirements, certificates must have a validity period of 825 days or fewer. If the certificate applied to EAM has a longer validity, it will be need to be updated at the Imprivata appliance level first.
After that change has been made, follow the instructions below to obtain the root certificate for use in Mobile Access Management.
See EAM's documentation on how to update certificates on the Imprivata appliance.
-
Mobile Access Management requires a root certificate (self signed or issued by a CA authority).
-
Use any web browser to download the root certificate from the appliance. Make sure you are downloading the Root certificate, not the certificate installed on the Imprivata appliance.
-
Upload this certificate this certificate to Mobile Access Management.
-
Beginning with 7.2, the Launchpad caches the Imprivata appliance list the first time it connects to EAM. It updates the list periodically, failing over to other available appliances when one is offline, and clears the list when the MAM server configuration is changed.
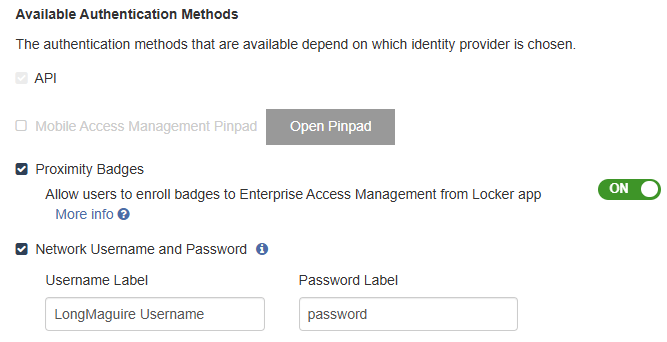
Configure settings in the Available Authentication Methods section.
Mobile Access Management allows new badge enrollments and Imprivata PIN enrollments during checkout. This is useful when users have a new or replacement badge that is not already enrolled in EAM.
Applies to iOS and Android devices.
-
In Admin > Check Out > Available Authentication Methods section, select Proximity Badges.
-
To allow new badge enrollments to EAM from the Locker app, switch the Allow users to enroll new badges to Enterprise Access Management from Locker app setting to ON.
NOTE:This setting is only available when Imprivata Enterprise Access Management is set as the Identity Provider (IdP), and is not supported for other custom web services.
You do not need to enable check out via network username and password for badge enrollment to work.
Click to enlarge
-
When prompted, restart the Launchpads.
This setting is enabled and not visible to disable for organizations created as of MAM 7.0 (June 2025).
This setting is displayed when the Password Autofill and SSO setting is switched to ON.
Imprivata recommends switching this setting to ON.
This setting controls whether users must provide a second factor in the Locker app during checkout to unlock the device.
During Check Out, users outside of their grace period see a Complete Verification button and must complete 2FA before exiting Locker app.
-
When the setting is switched to OFF, users outside of their grace period see a Continue button and can skip 2FA and exit Locker, but will not have access to Password Autofill or SSO.
-
When the setting is switched to ON, the user is not prompted for the second factor if the IdP does not require it.
Mobile Access Management also allows checking out using a username and password as an additional authentication method. This is useful when users forget to bring their badges to work.
Imprivata recommends selecting Network Username and Password as an available authentication method.
-
In Admin > Check Out > Available Authentication Methods, select Network Username and Password.
-
Some organizations use special terms for username, such as "Network ID", "Net ID", or similar. You may customize the terms you use by editing the Username Label and Password Label fields.
When enabled, the Locker app lock screen adds a button for users to type their network username and password to unlock the device.
For EAM enterprises configured with multiple domains, the user selects their correct domain from a list box of domains.
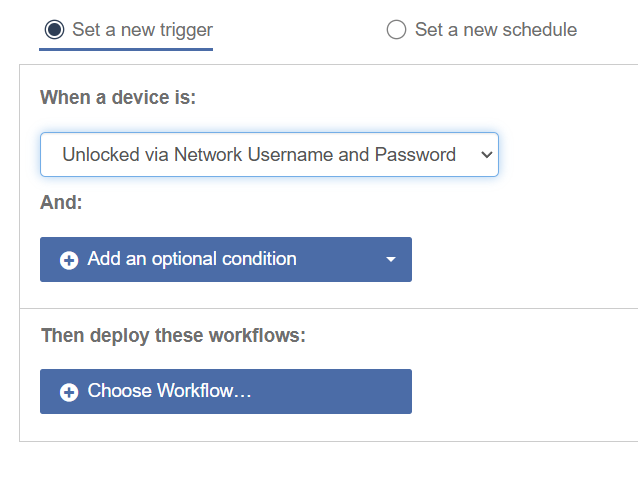
On successful checkout, Mobile Access Management can automate a Workflow. The automation must use the trigger Unlocked via Network Username and Password, and the Workflow use the Over the Air Workflow model.
Click to enlarge