Profiling PatientSecure with the Imprivata APG
This
If you are not already familiar with the tool, see the Imprivata Enterprise Access Management online help for a full treatment of planning and creating profiles. This does not include Imprivata PatientSecure information, but does provide background and principles on the tool.
PatientSecure Workflows
There are four types of workflows that you can profile:
-
Authentication/Search — identifies and proxies key identification information, usually a PID or MRN, from a PatientSecure scan to the EMR.
To set up an authentication workflow, you must capture a user search screen.
-
Enrollment/Summary — links a PatientSecure scan with a specific patient record.
To set up an enrollment workflow, you must capture a screen that gathers patient information.
-
Verification/Patient Check-In — verifies a scheduled patient. To set up a verification workflow, you must capture a scheduled check-in screen.
-
Combination — a combination of the first two types. For example some applications show patient information and a search screen on the same dialog or window.
A given profile may have multiple different screen types, depending on the complexity of the target application.
For example, you might have to capture more than one search screen, and a summary and combination screen as well.
Learning Methods
The following learning methods are supported:
-
Browser Helper Object (BHO)
-
User Interface Automation (UIA)
-
Winprobe
-
Google Chrome Extension
NOTE:GDI is not supported.
Application Types
The following application types are supported:
-
Client/server applications using UIA.
-
Client/server applications using WinProbe.
-
Edge Chromium Web applications using BHO or UIA.
-
Chrome Web applications using Google Chrome.
-
Java client/server or Web applications using UIA.
NOTE:Terminal emulators (TE) and host-based applications are not supported.
Profiling Prerequisites
Before you profile applications, ensure that you have:
-
An Imprivata agent installed and running on the computer where you intend to create profiles.
To run APG on Chrome or Edge Chromium, you first must upgrade to Imprivata OneSign 7.9 or later the Imprivata G3 (third generation) or G4 (fourth generation) appliances and the Imprivata endpoint agents in your enterprise.
-
A registry key added for any client/server application you want to profile in one of these locations.
-
64-bit: HKEY_LOCAL_MACHINE\SOFTWARE\Wow6432Node\SSOProvider\ISXAgent\AllowLearning
For example, to profile an app named Cosmo, add an entry "cosmo.exe" to the AllowLearning folder on the computer where you intend to create profiles.
-
-
Profiling for PatientSecure with Imprivata APG enabled through a Imprivata OneSign license setting.
Identity Attribute Pairs
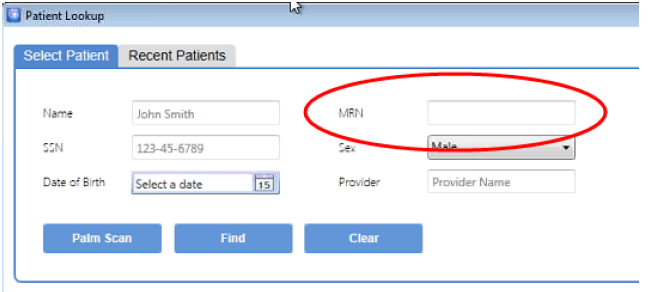
The PatientSecure functionality for Imprivata APG introduces a new concept: Identity Attribute Pairs. These pairs consist of a Patient Information field and a Reference Label, which combine to uniquely identify a field, its location, and the type of information it provides.
For example, to capture the MRN attribute illustrated below, you might have to:
- Identify the MRN tag on the screen as a Reference Label.
- The entry field beside it as a Patient Information field.
-
Pair the two entries.
Specific information on setting Identity Attribute Pairs is included in the profiling instructions.
Starting Your Profile
The Imprivata APG starts automatically when you add a new profile or edit an existing profile. The Imprivata APG runs in a new window in front of the Imprivata Admin Console. The Imprivata Admin Console remains running in the background.
To start the Imprivata APG:
- Launch the target application, and open the application screen you want to capture.
- In the Imprivata Admin Console, go to Applications > OneSign single sign-on application profiles.
-
Click Add to open the APG window, and select PatientSecure.
-
Add a name for the profile. Create a unique name that helps you identify the profile in future and click Next.
-
Choose which type of screen you want to capture, and consult the appropriate section of this